

If you’ve ever handed over the keys to a rental unit and then spent the next eight months regretting it, you already know why tenant screening matters. One bad decision at the application stage can turn into unpaid rent, property damage, and a legal process that drags on for the better part of a year. One good decision, on the other hand, can mean years of steady rent, a well-cared-for property, and a tenant relationship that runs itself.
Tenant screening for Canadian landlords has never been more important – or more complicated. Rents have climbed, competition for good units is fierce, and that pressure has pulled more applicants into submitting exaggerated or outright fake documents to get approved. At the same time, provincial human rights codes and privacy laws have tightened what landlords can ask, request, and store. Get screening wrong in either direction – too loose or legally careless – and you’re exposed.
This guide walks through exactly how to screen tenants the right way in 2026: what the law actually allows, which documents matter, how to spot fraud before it costs you, which screening tools are worth paying for, and how to build a process that protects your property without putting you on the wrong side of a human rights complaint. Whether you’re renting out your first condo or managing a growing portfolio, this is the tenant screening playbook you need.
Why Tenant Screening Matters More Than Ever
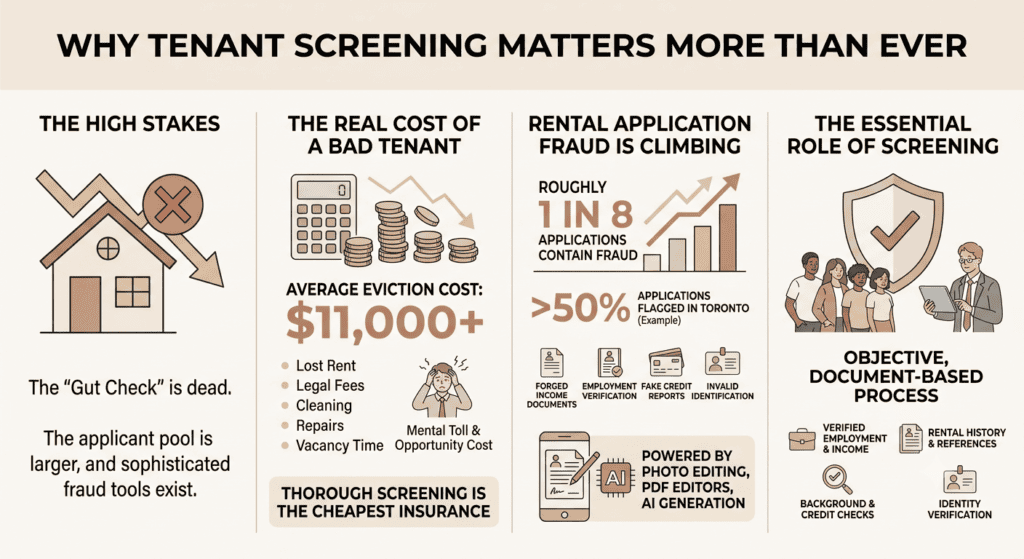
A few years ago, a landlord could get away with a quick gut check: meet the applicant, glance at a pay stub, shake hands. That approach doesn’t hold up anymore. The stakes are higher, the applicant pool is larger, and the tools available to both good and bad actors have gotten a lot more sophisticated.
The Real Cost of a Bad Tenant
The math on a bad tenant is brutal. Industry data from FrontLobby puts the average cost of a single eviction at roughly $11,000 once you add up lost rent, legal fees, cleaning, repairs, and the time your unit sits vacant while you go through the process. That figure doesn’t include the mental toll of chasing a non-paying tenant for months, or the opportunity cost of not being able to sell or refinance a property tied up in a dispute.
And that $11,000 is the “average” case. If the tenant causes serious damage, or if the eviction drags out because the case sits in a queue, the real cost climbs a lot higher. A thorough screening process is, quite simply, the cheapest insurance policy a landlord can buy.
Rental Application Fraud Is Climbing
Fraud is no longer a fringe risk. According to Snappt’s 2026 Fraud Trends Report, roughly one in eight rental applications now contains some form of fraud, most commonly forged income documents, employment verification, or rental history. In Toronto specifically, one large rental management firm reported that more than half of the applications it reviewed over a recent six-month stretch were flagged for falsified pay stubs, fake credit reports, or invalid identification.
The tools behind this shift are the same ones making everyday life easier: photo editing apps, PDF editors, and AI-assisted document generation. A forged pay stub that once had obvious tells – mismatched fonts, blurry logos, crooked alignment – can now look completely convincing on a phone screen. That’s exactly why a structured, document-based screening process matters more than a landlord’s gut instinct ever could.
Know the Law Before You Screen
Before you write a single screening question, it helps to understand where the legal lines actually sit. Canadian tenant screening law isn’t one national rulebook – it’s a mix of federal privacy legislation, provincial human rights codes, and, in some provinces, additional privacy statutes that go further than federal law.
Human Rights Codes and Protected Grounds
Every Canadian province prohibits housing discrimination against a list of protected characteristics – things like race, ancestry, place of origin, citizenship, creed, sex, sexual orientation, gender identity, family status, and disability. The exact list of protected grounds varies slightly by province, but the underlying principle is the same everywhere: your screening criteria has to be about the tenant’s ability to meet lease obligations, not about who they are.
In Ontario, this is spelled out clearly by the Human Rights Commission. Landlords may ask for income information, but only if they’re also considering credit references and rental history alongside it – income can’t be the sole basis for rejecting an applicant. It’s also worth flagging directly: a flat rent-to-income cutoff, like an automatic rejection of anyone paying more than 30% of income toward rent, is considered discriminatory under Ontario’s human rights guidance, because it disproportionately screens out lower-income applicants, newcomers, students, and people relying on fixed incomes. If you’ve been using a hard 30% rule as your screening bar, it’s worth rethinking how you frame that criterion.
The safest approach is to ask only what’s reasonably necessary to evaluate someone’s likelihood of paying rent and taking care of the unit – and to apply that same standard to every single applicant, without exception.
Privacy Law: What You Can Collect and Why It Matters
On top of human rights law, landlords also have to comply with Canada’s privacy framework. For most of the country, that means the federal Personal Information Protection and Electronic Documents Act, though British Columbia, Alberta, and Quebec have their own provincial privacy laws that apply instead. Quebec’s rules, updated under Law 25, are the strictest in the country and require private organizations – including individual landlords – to explain clearly how personal data will be used, limit what they collect to what’s actually necessary, and store it securely.
In practice, this means a few concrete things for every landlord:
- Get written consent before running a credit check, background check, or contacting an employer.
- Collect only what you actually need for the decision – extensive financial history, a driver’s license number, or a Social Insurance Number generally isn’t necessary and shouldn’t be requested or stored.
- Tell applicants clearly why you’re collecting information and how it will be used.
- Store documents securely and delete them once they’re no longer needed, rather than letting rejected applications pile up in an email inbox indefinitely.
A tidy, well-documented process isn’t just good ethics – it’s your best defence if a rejected applicant ever challenges your decision.
Building a Fair, Repeatable Screening Process
The single biggest mistake landlords make isn’t asking the wrong question – it’s asking different questions to different applicants. Inconsistency is what turns an innocent screening decision into a discrimination complaint, because it creates the appearance that some applicants were held to a different standard than others.
Set Your Criteria Before the First Application Arrives
Before you list the property, decide on your minimum standards and write them down:
- Minimum credit score (a commonly cited benchmark is around 650–660, though this should flex depending on your market and unit)
- Minimum income relative to rent, framed alongside credit and rental history rather than as a standalone cutoff
- Employment stability requirements (for example, proof of steady income over the past 3–6 months)
- Number and type of references required
- What counts as an automatic disqualifier (an active eviction order, for instance) versus something you’ll evaluate case by case
Once these standards exist on paper, use them for every applicant, in the same order, every time. If you ask one shortlisted applicant for two months of bank statements, ask every shortlisted applicant for the same thing.
Why Consistency Is Your Legal Shield
Consistency does double duty. It protects tenants from unfair treatment, and it protects you. If a rejected applicant ever files a human rights complaint or disputes your decision, your documented, uniformly applied process is exactly what demonstrates the decision was based on legitimate criteria – not a protected characteristic. Landlords who skip this step and rely on instinct are the ones who end up unable to explain, months later, why one applicant was approved and a similar one wasn’t.
This matters even more when you’re renting out multiple units or working with a partner or property manager on approvals. The moment more than one person is involved in screening decisions, informal “gut feeling” criteria become almost impossible to apply evenly – one person’s read on an applicant will never perfectly match another’s. A written checklist takes that variability out of the equation. Everyone involved in approving tenants works from the same list, in the same order, which means the applicant pool is judged on the same terms regardless of who happens to review the file.
It’s also worth building a small amount of flexibility into your criteria from the start, rather than discovering the need for it mid-search. Newcomers to Canada, students, and self-employed applicants often can’t produce a traditional Canadian credit history or a standard T4 employment letter – not because they’re higher risk, but because their financial documentation simply looks different. Deciding in advance how you’ll evaluate these applicants (through a larger security deposit where legally permitted, a guarantor, or alternative proof of income such as bank statements and Notices of Assessment) keeps your process both fair and legally sound, rather than leaving you to improvise a workaround under pressure once an application is already in front of you.
Step-by-Step Tenant Screening Checklist
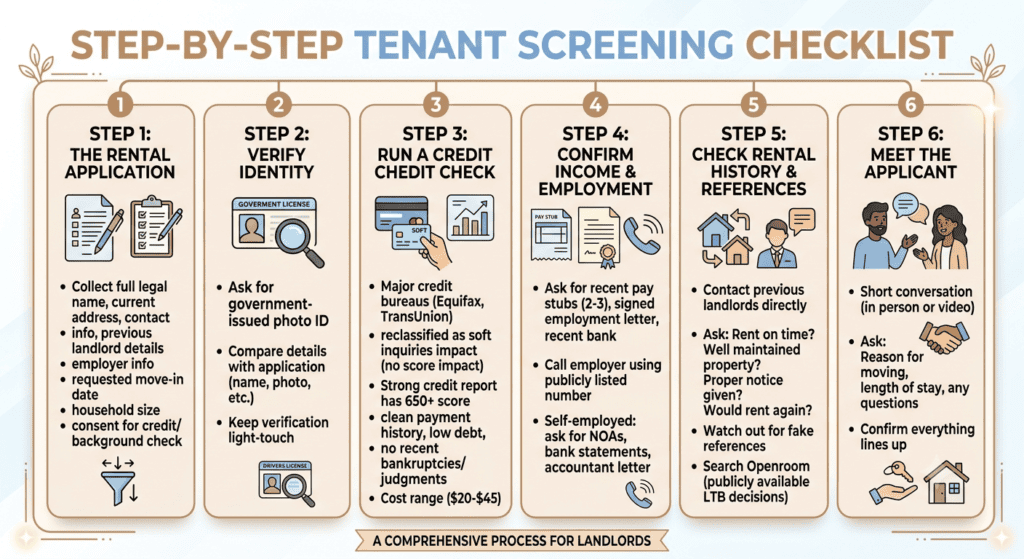
Here’s the full process, broken into the order most experienced landlords actually follow it.
Step 1: The Rental Application
Everything starts with a complete, standardized rental application form. At minimum, collect:
- Full legal name and current address
- Contact information
- Current and previous landlord details
- Employer name and contact information
- Requested move-in date and household size
- Consent to run a credit and background check
A well-built application does a lot of the early filtering for you. Applicants who are disorganized, evasive, or unwilling to provide basic details at this stage are giving you useful information before you’ve spent a dollar on a formal check.
Step 2: Verify Identity
Ask for a government-issued photo ID and compare the name, photo, and details against the rest of the application. This step catches more problems than landlords expect – mismatched names, inconsistent addresses, or IDs that simply don’t match the person standing in front of you during a showing. Keep the verification light-touch: confirm the ID is valid and matches the applicant, and avoid retaining a scanned copy longer than necessary.
Step 3: Run a Credit Check
This is the backbone of tenant screening for Canadian landlords, and it’s where most of the financial risk gets filtered out. As of late 2024, Canada’s two major credit bureaus reclassified rental credit checks as soft inquiries, meaning a landlord pulling a tenant’s credit report no longer affects that applicant’s credit score – a change worth mentioning to nervous applicants who may still believe otherwise.
Equifax vs. TransUnion: Do You Need Both?
Equifax and TransUnion don’t always hold identical information, since not every lender or creditor reports to both bureaus. A single-bureau report is often enough for a straightforward applicant, but a dual-bureau report gives a fuller picture and can catch details a single bureau might miss – particularly useful for applicants with thin or unusual credit histories, such as newcomers to Canada or younger renters. Third-party platforms typically charge somewhere in the $20–$45 range for a single report and a bit more for a combined dual-bureau version.
What a Strong Credit Report Looks Like
You’re looking for a few key data points: a credit score generally north of 650 (the average reported tenant credit score sits right around that mark), a clean or mostly clean payment history, manageable debt levels relative to income, and no recent bankruptcies, collections, or court judgments tied to unpaid rent. None of these numbers should be treated as an automatic pass-fail line on their own – they work best as one piece of a bigger picture, alongside income verification and rental history.
Step 4: Confirm Income and Employment
Ask for recent pay stubs (two or three, not just one), a signed employment letter, and, where appropriate, a recent bank statement. Then go one step further and actually call the employer using a publicly listed number – not one written on the pay stub itself – to confirm the applicant currently works there. This single phone call is one of the most effective fraud checks available, and it costs nothing but a few minutes.
For self-employed applicants, contractors, or newcomers without a long Canadian income history, ask for Notices of Assessment, bank statements showing consistent deposits, or a letter from an accountant. Don’t automatically disqualify applicants who don’t fit the traditional employee mould – just verify their income through the documentation that actually fits their situation.
Step 5: Check Rental History and References
Contact at least one or two previous landlords directly, and ask specific, comparable questions of each: Did rent arrive on time? Was the property well maintained? Was proper notice given before move-out? Would you rent to this person again?
It’s worth being cautious about references an applicant supplies that turn out to be a friend posing as a former landlord – a pattern experienced property managers say they’ve run into more than once. If something about a reference feels off (a personal cell number instead of a property management line, vague or rehearsed-sounding answers), it’s reasonable to ask for an additional reference or verify ownership of the property through a quick public records search.
A resource worth knowing about here is Openroom, a crowdsourced Canadian platform where landlords can search a prospective tenant’s name against publicly available Landlord and Tenant Board decisions. It won’t catch everything, but it’s a useful, low-cost way to check for a documented history of non-payment or eviction disputes.
Step 6: Meet the Applicant
A short conversation, in person or by video, rounds out the picture. Ask about their reason for moving, how long they typically stay in a rental, and whether they have any questions about the property or the lease. This isn’t about grilling someone – it’s a chance to confirm that everything on paper lines up with the person you’re actually about to hand keys to.
How to Spot a Fake Rental Application
Fraud detection deserves its own section because the numbers are too significant to treat casually. A recent industry breakdown put the makeup of fraudulent applications at roughly 45% involving income misrepresentation, 30% falsified pay stubs, 20% false employment claims, and 15% altered bank statements – often overlapping within the same application.
Common Red Flags in Documents
Look closely for:
- Inconsistent fonts, spacing, or alignment within a single pay stub
- Math that doesn’t add up – net pay that’s implausibly high relative to gross pay, or year-to-date totals that don’t match the pay period
- Employment start dates that don’t match year-to-date earnings shown on the stub
- Pay stubs or letters with a personal cell number instead of an official company line
- Documents that look “too clean” – generic templates with no company branding, logo, or letterhead
No single red flag proves fraud on its own – payroll systems vary widely between employers, and small businesses sometimes use basic, unbranded templates. The signal worth acting on is a pattern of inconsistencies, not one odd detail in isolation.
How to Verify What You’re Being Shown
The most reliable verification isn’t a forensic examination of a PDF – it’s an independent phone call. Call the employer using a number you found yourself, not one printed on the document. Ask to speak to HR or the listed manager and confirm the applicant’s role, start date, and employment status. Cross-reference the pay stub against a recent bank statement to see if the deposits match. And if anything still feels inconsistent, it’s entirely reasonable to ask the applicant directly for clarification before making a decision – a real explanation (a recent raise, a payroll system quirk) is easy to provide; a fabricated one usually isn’t.
Best Tenant Screening Tools for Canadian Landlords
You don’t have to build this process from scratch. Several Canadian-focused platforms bundle credit checks, background checks, and application management into one system.
SingleKey is one of the most widely used platforms in Canada, pulling directly from Equifax and TransUnion and bundling credit, eviction history, and income verification into a single tenant report, typically priced in the $30–$45 range depending on whether you choose one bureau or both.
Certn offers background and identity verification alongside credit reporting, often used by larger portfolios and property management companies that need a more robust compliance trail.
FrontLobby focuses on credit reporting specifically, including the ability to report on-time and late rent payments to Equifax – useful leverage that also gives good tenants an incentive to stay current.
Openroom stands apart as a free, crowdsourced tool for checking a tenant’s history against public Landlord and Tenant Board decisions, which pairs well with a paid credit check rather than replacing one.
For most independent landlords, a single paid platform that bundles a credit report with income and identity verification covers the bulk of what’s needed, with Openroom as a useful free supplement.
It’s worth noting that these platforms are tools, not decision-makers. A tenant score or AI-generated risk rating can flag patterns a busy landlord might miss across dozens of applications, but the final call should still come down to a human reviewing the full picture – credit, income, references, and the conversation you had with the applicant – rather than a single number on a dashboard.
Common Tenant Screening Mistakes to Avoid
Even landlords who mean well tend to fall into a handful of predictable traps. Watching for these can save you a lot of trouble down the road.
Skipping the phone call. Reviewing documents on a screen is convenient, but it’s not a substitute for actually calling an employer or a former landlord. Fraudulent documents are built to survive a quick glance – they rarely survive a direct conversation with the person named on them.
Changing the process mid-search. It’s tempting to relax your standards when a listing has been vacant for a few weeks, or to add an extra requirement for one applicant you’re unsure about. Both moves undermine the consistency that protects you legally, and both tend to lead to worse outcomes than sticking with your original criteria.
Relying on a single piece of information. A great credit score doesn’t rule out someone who’s difficult to live near. A great in-person impression doesn’t rule out falsified income documents. Screening works because the pieces are checked together – no single data point should carry the whole decision.
Not documenting the decision. If you reject an applicant, note why, using language tied to your stated criteria (insufficient income verification, unfavourable rental history, incomplete application) rather than anything that could be read as connected to a protected characteristic. This record protects you if the decision is ever questioned.
Over-collecting personal information. Asking for a Social Insurance Number, a full financial history, or documents unrelated to the tenancy doesn’t make your screening more thorough – it just increases your privacy exposure and, in some cases, discourages otherwise-qualified applicants from bothering to apply.
What Happens When You Skip Proper Screening
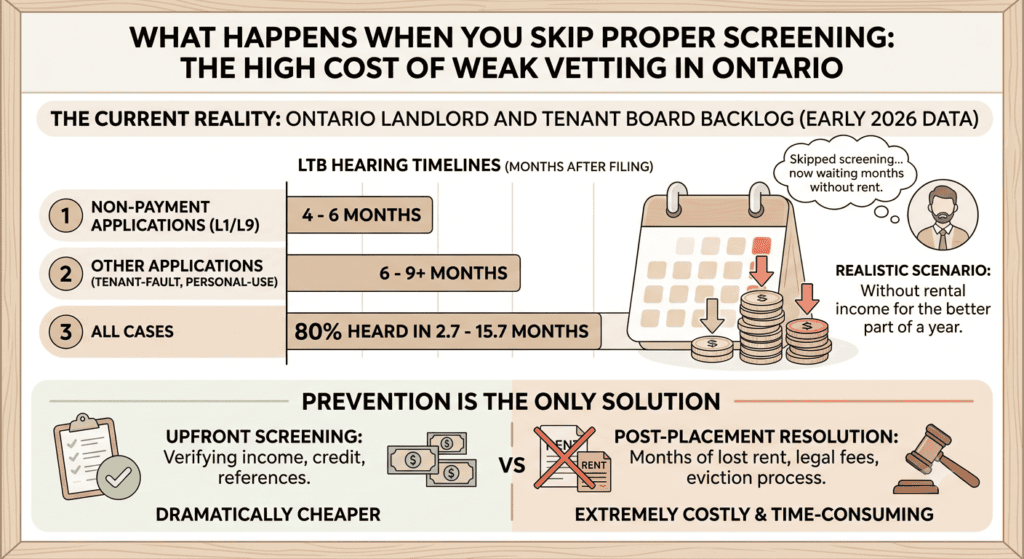
The consequences of weak screening aren’t hypothetical – they play out in Ontario’s Landlord and Tenant Board every day, and the current backlog makes the stakes higher than they’ve ever been.
As of early 2026, roughly 80% of LTB cases are being heard somewhere between 2.7 and 15.7 months after filing, and non-payment applications specifically are typically scheduled 4 to 6 months out, with other application types – including tenant-fault and personal-use evictions – often taking 6 to 9 months or longer. That’s not a worst-case estimate; it’s the current normal. If a tenant stops paying rent in month one, a landlord relying on the LTB to resolve it could realistically be without rental income, and without a resolution, for the better part of a year.
That timeline is exactly why screening upfront matters so much more than trying to fix a bad tenancy after the fact. Every dollar and hour spent verifying an applicant before signing a lease is dramatically cheaper than the months of lost rent and legal process that follow a bad placement.
Your Tenant Screening Quick-Reference Checklist
Keep this list handy for every applicant, every time:
- [ ] Standardized rental application completed in full
- [ ] Written consent obtained for credit and background checks
- [ ] Government ID verified against application details
- [ ] Credit report pulled (single or dual bureau, based on applicant profile)
- [ ] Two to three recent pay stubs or income documents reviewed
- [ ] Employer contacted directly and independently to confirm employment
- [ ] At least one previous landlord contacted for a reference
- [ ] Rental history checked against public LTB records where possible
- [ ] Same criteria and process applied consistently to every applicant
- [ ] All documents stored securely and deleted once no longer needed
Frequently Asked Questions
Is it legal for landlords to run a credit check on tenants in Canada? Yes. Running a credit check is legal across Canada, provided you obtain the applicant’s written consent first and use the information only for the purpose of evaluating the rental application.
Can a landlord reject an applicant based on income alone? Generally, no – at least not in Ontario. Human rights guidance requires that income be considered alongside credit references and rental history, not as a standalone basis for rejection. A flat rent-to-income cutoff can also be considered discriminatory.
How much does a tenant credit check cost in Canada? Most third-party screening platforms charge somewhere between $20 and $45 per report, depending on whether you request a single-bureau or dual-bureau (Equifax and TransUnion) check.
Does a tenant credit check hurt the applicant’s credit score? No. As of late 2024, both major Canadian credit bureaus classify rental credit checks as soft inquiries, meaning they don’t affect the applicant’s credit score.
What’s the biggest red flag in a rental application? Inconsistency is the biggest tell – mismatched dates, employment details that don’t line up with income documents, or references that seem rehearsed or personally connected to the applicant rather than a genuine former landlord.
How long does it take to evict a non-paying tenant in Ontario right now? As of 2026, non-payment eviction applications are typically scheduled for a hearing 4 to 6 months after filing, though wait times vary and some cases take considerably longer. This is exactly why thorough upfront screening is so much more effective than relying on the eviction process to correct a bad placement.
Final Thoughts: Screen Smart, Rent With Confidence
Good tenant screening isn’t about being suspicious of every applicant – it’s about giving every applicant a fair, consistent, well-documented chance to prove they’re the right fit, while protecting your property from the small percentage who aren’t being honest. In a rental market where document fraud is genuinely on the rise and the legal process for resolving a bad tenancy can take the better part of a year, the extra hour spent verifying income, calling a former landlord, and checking a credit report isn’t optional anymore – it’s the foundation of running a rental property well.
Get the process right once, apply it consistently, and screening stops being a source of stress and starts being one of the simplest ways to protect your investment.
Let The HAH Developments Handle Screening For You
Building and running a airtight screening process takes time most property owners don’t have – and getting it wrong, whether that means a costly bad tenant or a compliance misstep, can be far more expensive than handing it off to professionals. The HAH Developments manages the full tenant placement process for property owners across Niagara Falls and the surrounding region, from marketing your unit and verifying every applicant to handling leases and ongoing property care.
If you’d rather spend your time collecting rent than chasing down pay stubs and references, reach out to The HAH Developments today to see how stress-free property management can be.